Accruent Siterra 25.3 Release Notes
We're delivering this automatic upgrade to UAT environments on May 15, 2025 and to production environments on June 7, 2025.
Release notes are subject to change until the production release.
Revision Task Groups
SP-56847, SP-56844
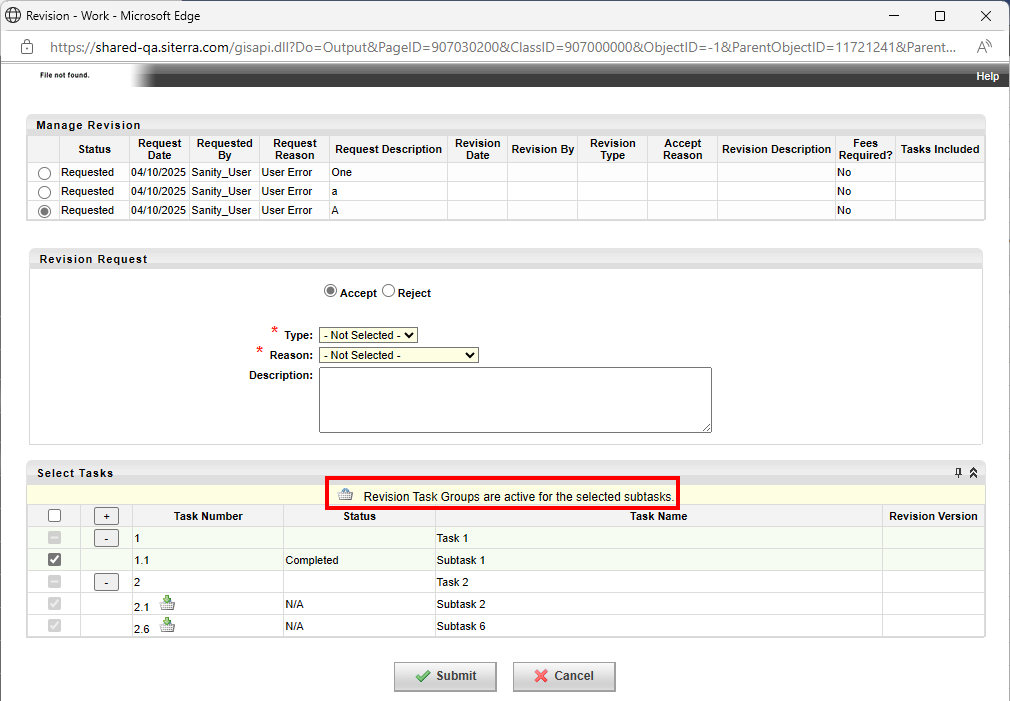
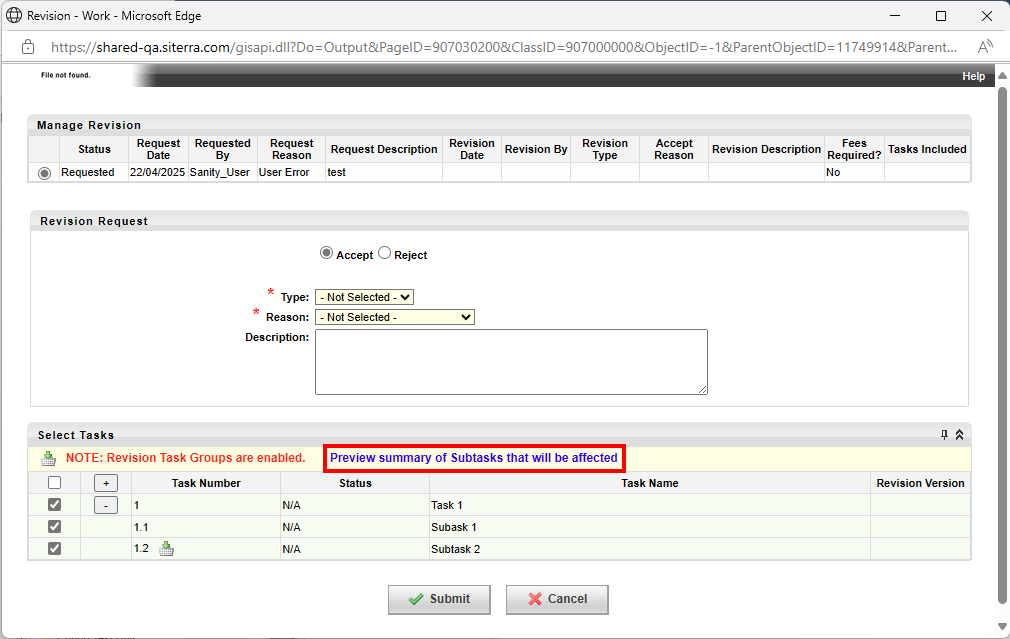
If Revision Task Groups is enabled in your system, the Manage Revision page where you select tasks to include in a revision now enforces configured Revision Task Groups. For example, when you select a subtask to be included in the revision and that subtask is configured with a Revision Task Group, all applicable subtasks from the Revision Task Group are automatically selected and their options deactivated so that you can't deselect them. A banner also displays at the top of the Select Tasks pane indicating that Revision Task Groups are selected for the subtasks you selected.
As an Administrator, you can configure the behavior of Revision Task Groups in a Schedule Template if the Configure Revision Task Groups option displays in the toolbar of the Schedule tab.
If the Configure Revision Task Groups option does not display, contact Support to request that the Portfolio Configuration setting for the REVISION_TASK_GROUPS option is enabled on your system.
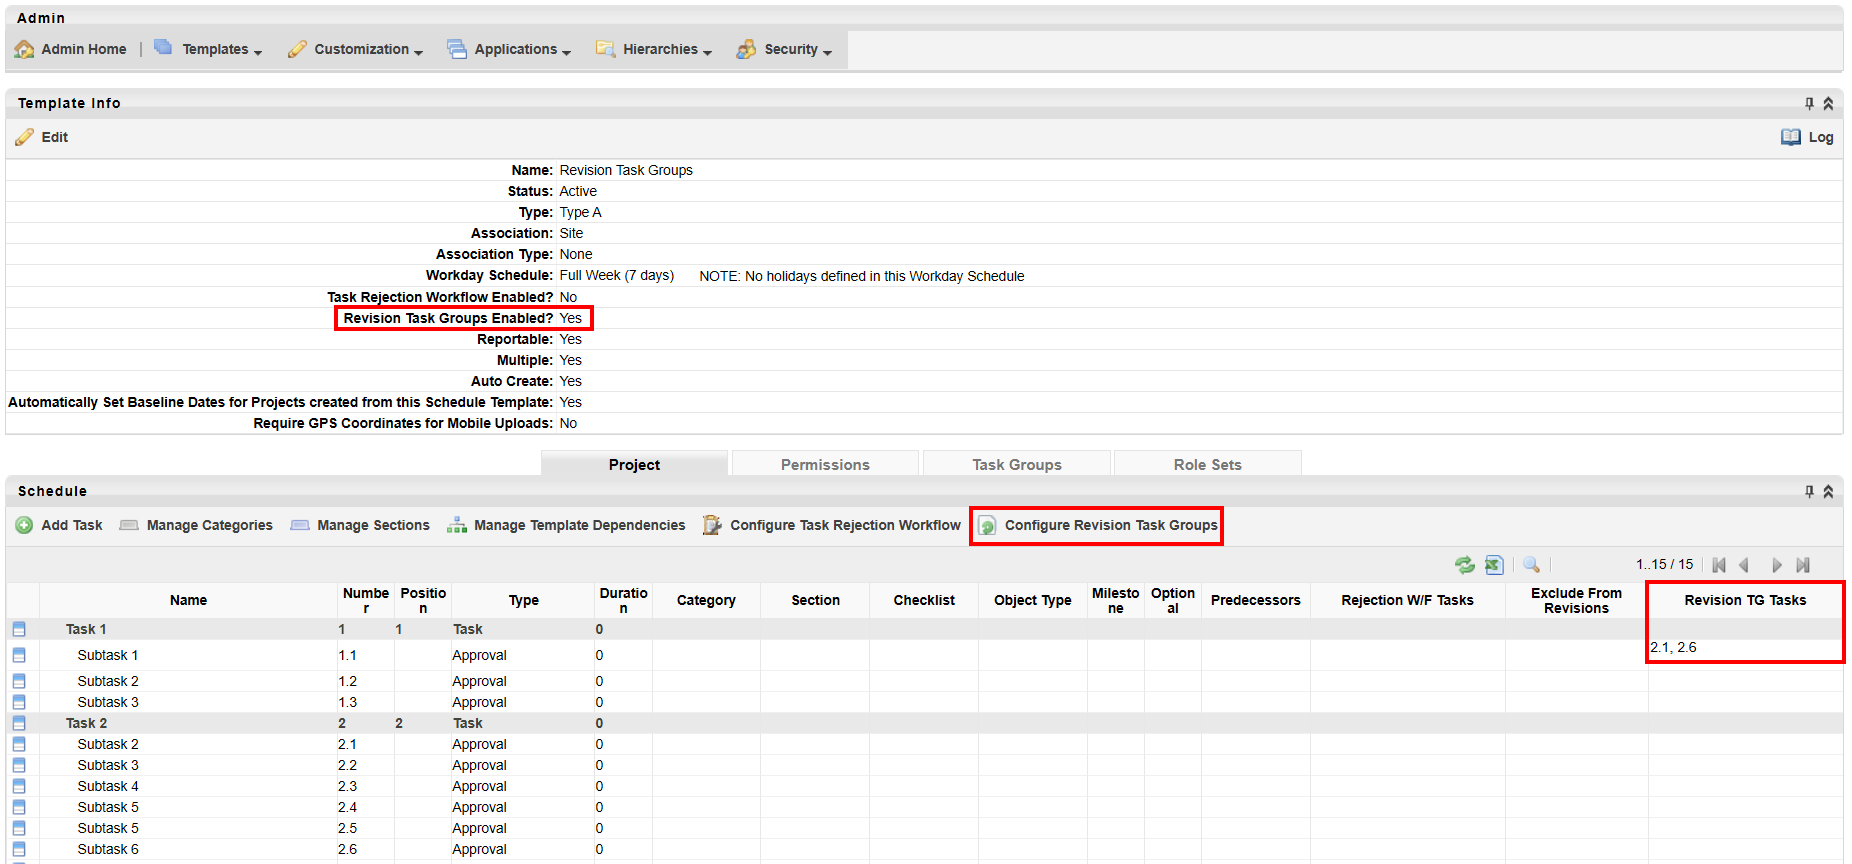
Once you have configured a Revision Task Group for the template, Revision Task Groups Enabled? is Yes. The Revision TG Tasks column displays the tasks that are part of the Revision Task Group.
-
Click Configure Revision Task Groups.
-
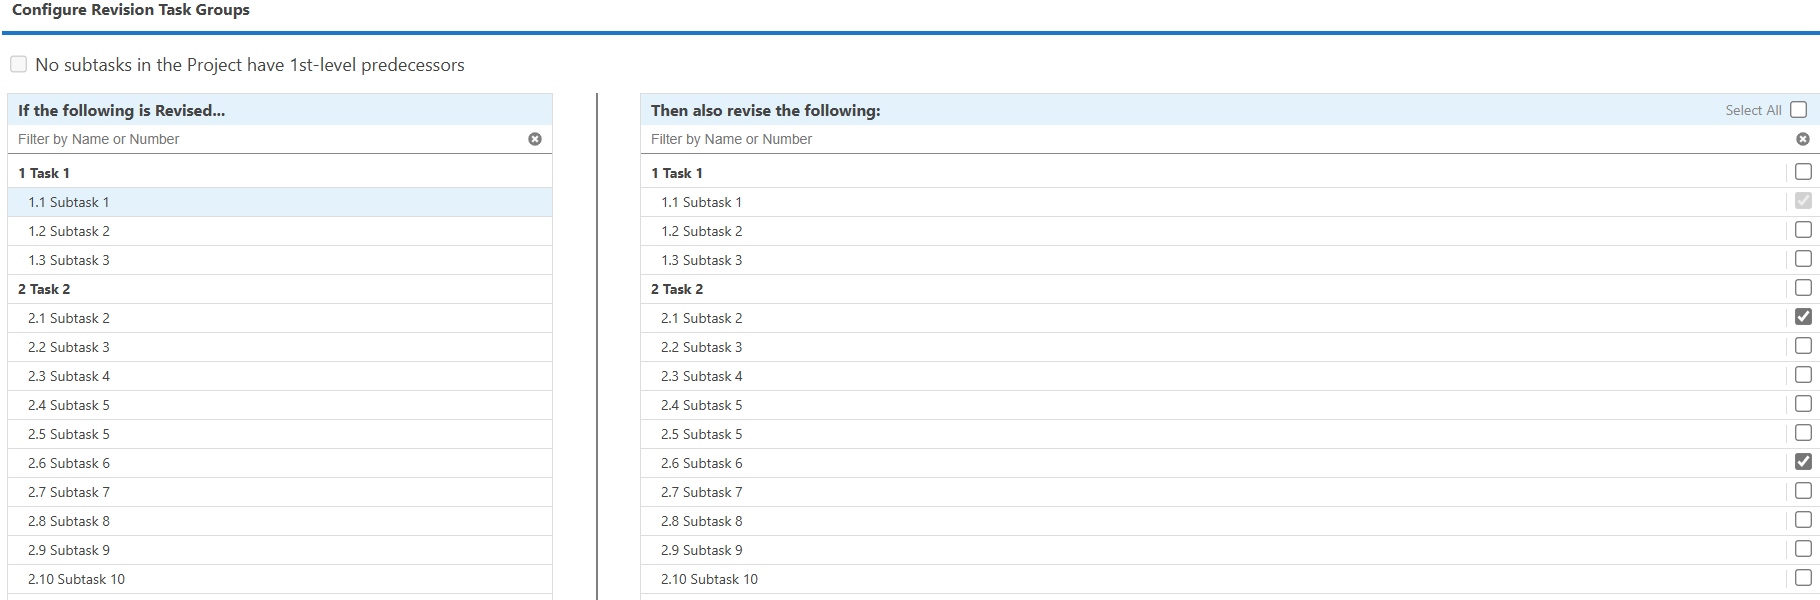
In the leftmost column, select a task that you want to control the revision status of other tasks with.
-
In the rightmost column, select the tasks that you want to revise if the task in the previous step is revised. Alternatively, Select All to revise all tasks.
-
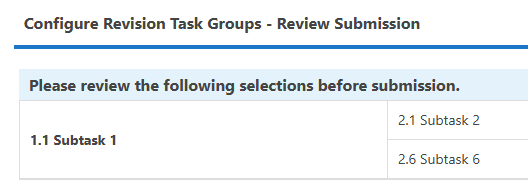
Click Next.
-
Review the changes, then click Submit to apply the changes.
Request revision
SP-56845
If Revision Task Groups are enabled for your project and you request a revision of tasks that belong to a Revision Task Group, a banner now displays in the Select Tasks pane of the Manage Request page which indicates that Revision Task Groups are enabled. The banner includes a link that to preview affected tasks.
-
Click Manage Revision in the Project Schedule of your project.
-
Enter the Revision Request information
-
Select the tasks where you want to apply the revision
If you select tasks that belong to a Revision Task Group, a banner displays where you can preview the subtasks affected by the change
-
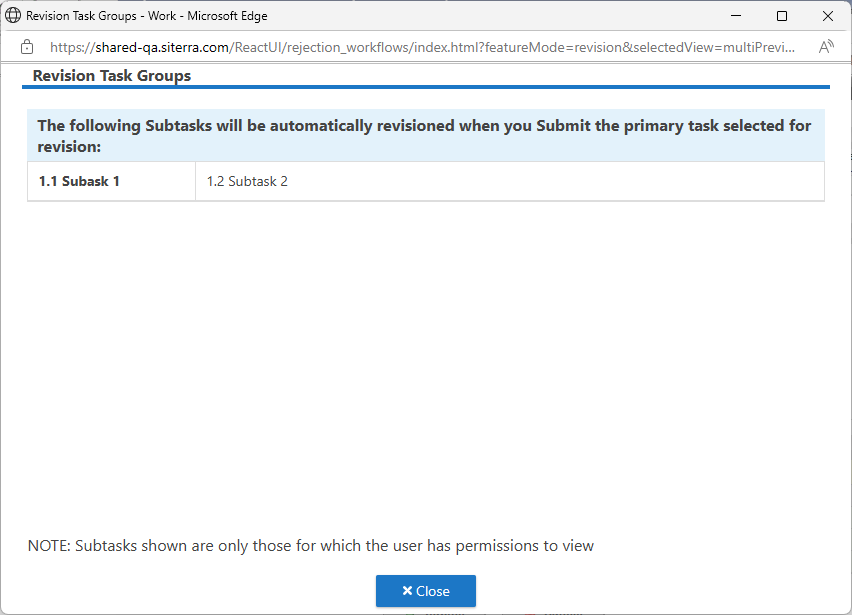
Click Preview summary of Subtasks that will be affected to display a preview of affected tasks.
The Revision Task Groups window displays.
-
Click Submit.
Improvements and issues fixed
|
Component |
Summary |
Reference # / Case |
|---|---|---|
|
MFA |
If Multi-Factor Authentication (MFA) is enabled on your system, when you sign in using MFA, the access token is now set using the correct value so that Siterra functionality that relies on the access token now works correctly. |
SP-57217 01692447 01692325 |
|
API |
If your user has the role-based permissions to do so, you can now use the taskoperation HTTP endpoint in the Projects module to PATCH project tasks without requiring Administration privileges. For example: {baseApiPath}/projects/v1/taskoperation |
SP-57091 01692325 01676806 |
|
API |
If your user has the role-based permissions to do so, you can now use the IncidentExtendedAttributes HTTP endpoint to GET Incident Extended Attributes. For example: {baseApiPath}/ExtendedAttributes/v1/IncidentExtendedAttributes(incidentId) |
SP-54886 |
|
API |
If your user has the role-based permissions to do so, you can now use the IncidentExtendedAttributes HTTP endpoint to POST an Incident Extended Attribute. For example: {baseApiPath}/ExtendedAttributes/v1/IncidentExtendedAttributes |
SP-54887 |
|
API |
If your user has the role-based permissions to do so, you can now use the IncidentExtendedAttributes HTTP endpoint to PATCH an Incident Extended Attribute. For example: {baseApiPath}/ExtendedAttributes/v1/IncidentExtendedAttributes |
SP-54888 |
| API |
If your user has the role-based permissions to do so, you can now use the ProjectExtendedAttributes HTTP endpoint to POST Project Extended Attributes without requiring Administration privileges. For example: {baseApiPath}/ExtendedAttributes/v1/ProjectExtendedAttributes. |
SP-54889 |
| API |
If your user has the role-based permissions to do so, you can now use the Extended Attributes SearchRingExtendedAttributes HTTP endpoint to POST Search Ring Extended Attributes without requiring Administration privileges. For example: {baseApiPath}/ExtendedAttributes/v1/SearchRingExtendedAttributes(searchRingId) |
SP-54890 |
|
API |
If your user has the role-based permissions to do so, you can now use the Extended Attributes SearchRingExtendedAttributes HTTP endpoint to PATCH Search Ring Extended Attributes without requiring Administration privileges. For example: {baseApiPath}/ExtendedAttributes/v1/SearchRingExtendedAttributes(searchRingId) |
SP-54891 |
|
Security |
For sign on authentication, Secret Question/Answer text is now encrypted for improved security. |
SP-56234 |
|
Extended Attributes |
When you create an extended attribute with a symbol such as squared (² alt 0178), the symbol is now retained and not replaced with a question mark icon � when you submit the changes and reopen it. For example, create a calculated extended attribute under Asset:
|
SP-57125 01690241 01689104 |
|
Primary Contact |
When you enter Primary Phone, that phone number now displays in Primary Contact. For example:
|
SP-56983 01684239 01682651 |
|
Extended Attributes |
The Euro currency symbol € and others such as в ₱ ﷼ ₪ ₩ ₭ ден ₮ ₦ zł ₽ ฿ ₴ now display correctly in textual extended attributes on a form when you save it. The symbol is no longer replaced with the question mark icon �. For example:
|
SP-56842 |
|
Payment lines |
If the first payment of a payment header is a partial amount and is paid, a percentage increase on the first date of the header now generates a correct retroactive payment amount. |
SP-56454 SP-56613 |